Tag Archives: fondant

Winter Wonderland

15 Jan

Holidays have come and gone, but there is plenty of WINTER still left to bake for! Check out this 2-tier Winter Wonderland cake I made for my holiday party at the office – follow the simple steps and make your work of art the focal point of any get together!

Make sure to read the TIPS to follow my previous posts on tiered cakes, buttercream, and fondant.


What you’ll need:

Quantity: Sufficient for 40 Guests

  • Baked cakes – two 9″ cakes and two 6″ cakes (follow building a tiered cake post)
  • Buttercream (follow buttercream recipe post – will need 2 batches)
  • Fondant (follow fondant recipe post – will need 2 batches)
  • Blue fondant color gel
  • 4 plastic dowels (each should be 5 inches tall)
  • Cake leveler (or serrated knife for leveling cake)
  • Snow flake shaped cookie cutter
  • Circle shaped cookie cutter (larger than snow flake cookie cutter)

Process:

  1. Bake and level two 9″ inch cakes and two 6″ cakes.
  2. Frost the top of one 6″ cake with buttercream and stack the second 6″ cake on top of it. Cover this whole tier with buttercream.
  3. Repeat step 2 for the 9″ cakes as well. You will now have a total of 2 stacked cakes – Refrigerate both for approx. 30 mins.
    TIP: Follow my “Building a Single Tier Fondant Cake” Post and my “Flavored Buttercream Made Easy” Post.
  4. Dip a toothpick into your blue colored fondant gel and spread onto the first batch of your fondant. Repeat 2-3 times.
    TIP: Follow my “The Best Marshmallow Fondant” Post.
  5. Fold fondant into itself and roll out until the you get an even blue tone.
  6. Roll out fondant and drape over all cakes.
  7. Using the second batch of fondant (non-colored), create ribbons for your pom-pom bow. Start by rolling out your fondant and cutting 5 strips of fondant (all strips need to be an even length and width). Create a loop with each strip so that one end of the strip is secured to the other end. Hang from a long dowel or pipe so that the fondant dries in the shape of a loop.
    TIP: Use water as your ‘glue’ to secure one end of the strip to the other end. See pic below:

  8. Roll out the remaining non-colored fondant so that it is 1/4″ thick. Press the circle cookie cutter into the fondant and cut out 6 of these fondant circles. Now press the snowflake cookie cutter into each of these fondant circles – pull out the snowflake portion so that you have a total of 6 snowflakes, and 6 circles with a missing snowflake shape.
    TIP: This sounds tricky but it’s the easiest step – check out the pic below:
  9. Place the circle fondant designs around the 9″ cake (1 1/2 inches apart). Place the snowflake designs around the 6″ cake (1/2 inch apart). Place the 4 dowels into the center of the 9″ cake – this creates a strong foundation for the second tier to sit on.
  10. Stack the 6″ cake on top of the 9″ cake and finish off by wrapping a string of fondant around the base of each cake tier.
  11. Place each of the 5 pieces of the pom-pom ribbon strips on top of the 6″ cake in a circular shape.
  12. CONGRATS! You’re ready to show off your masterpiece:

ENJOY! Don’t forget to COMMENT, SUBSCRIBE, and SHARE with all your friends!
Cheers

Farhat <3.

Building a Single Tier Fondant Cake!

4 Mar

Hey All – I thought it was time I did a quick HOW-TO on building a single tier cake! I’ll eventually have posts on stacking cakes (more then 1 tier) but for now I though it would be best to keep it simple. I found myself smiling more and more as I completed each step of the process when I made my first cake. I hope you all feel as proud as I did after doing this for the time!!

What You’ll Need

  • Two baked cakes (any size – I used two 9 inch cake pans to bake both cakes in the pictures)
  • Buttercream (any flavor – I used vanilla in the pictures)
  • Spatula
  • Serrated knife (or any sharp knife)
  • Plastic (NOT wooden) rolling pin
  • Fondant smoother
    Tip: If you don’t have this, make a ball out of some leftover fondant and rub against the fondant on the cake to smooth it out!)

  1. Bake two 9 inch cakes (Wilton has the best 9inch cake pans!)
  2. Let your two cakes cool for 15 minutes
  3. Using a serrated knife, trim the dome from the top of each cake so that the cakes have a flat and leveled surface
  4. Place one cake on a round cake board
    Tip: You can purchase these from Wal-Mart – I buy the Wilton branded ones
  5. Put some Buttercream (to your liking) on top of one of the cakes
  6. Take the second cake and put it on top of the cake that you just put buttercream on – you now have your 1 tiered cake (one 9 inch cake on top of the other!)
  7. Now smother buttercream over the whole double layered cake
  8. Put in the fridge for about half an hour
  9. Take the cake out and smother on another thin layer of buttercream over the whole cake (this will act as the glue for the fondant!)
  10. Using your plastic rolling pin, roll out your fondant to be about 15 inches long and wide (make it as circular as you can)
    Tip: If your fondant is tough to roll out, heat it in the microwave for 30 seconds and it’ll become softer
  11. Roll the fondant onto your pin and drape it over your cake
  12. Use your hands to get the fondant onto the cake properly
    Tip: NEVER pull DOWN on the fondant when you’re using your hands to put it on the cake – pat it gently and push the fondant upwards to smooth it out. This avoids creating cracks in your fondant
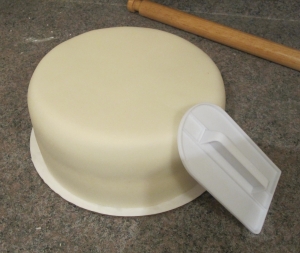
  13. Now use the fondant smoother to rub on the top and sides of your cake – this takes out any bubbles and lumps
  14. Cut off any excess fondant from the bottom of the cake
    Tip: If you don’t have a fondant smoother, use this excess fondant and rub it against the fondant on your cake to smooth it out!

Voila! You’ve built your single layer fondant cake. Spruce it up with fondant bows and polka dots or keep it simple using ribbons!

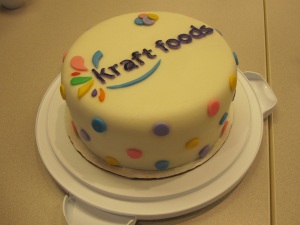
Here’s an example of a cake I made a few months ago:

Enjoy everyone 🙂

The Best Marshmallow Fondant!

21 Feb

You all know how bitter fondant can taste. You also know that marshmallow fondant is one of the few solutions to having enjoyable fondant. What you don’t know is the best recipe for marshmallow fondant – here’s a sweet cure:
What you’ll need:

  • 2 cups of marshmallows (500 grams)
  • 3 tbsp of water
  • 1/2 cup of Crisco
  • 2 pounds of icing sugar (8 cups)
  • 1 tbsp measuring spoon
  • sifter
  • rubber spatula
  • scraper (i just use a metal spatula-like utensil)
  • mixer with dough hook

Process:

  1. Add 3 tbsp of water to your bowl of marshmallows and heat in the microwave for 1 minute and 30 seconds

  2. Take out marshmallow bowl once complete and stir the melted marshmallows very well in order to mix in the water (at first the marshmallows won’t look melted but wait till you stir them – you’ll see that they are in fact gooey to perfection!)
  3. Add the Criso, icing sugar, and melted marshmallows to your mixer (in that order!)
    Tip: Mixer bowl filled to the top? Don’t worry, this is exactly what your mixer should look like!
  4. Place your dough hook on the mixer and hold up the mixer head a little bit so that everything gets mixed well and to prevent the marshmallow from flowing over the dough hook
  5. Mix on medium to high speed until the ingredients form a fondant ball
    Note: If you want to color your fondant, add the color gel in now – Wilton gels are great for coloring fondant! 


  6. Dust your counter top with sifted icing sugar and place your fondant ball on it (this prevents it from sticking)
  7. Take out any leftover icing sugar from your mixer and add it to the fondant ball
  8. Knead out your fondant until all of the icing sugar is incorporated
    Tip: Fondant too sticky? Add a little icing sugar! Too dry? Add a little Crisco!
  9. Roll out and use the fondant to drape your cake OR double cling wrap it and store at room temperature for up to 3 weeks!

Voila – Enjoy your DELICIOUS fondant!

Cheers!